Pages

Thursday, April 19, 2012

settlers of catan cookies

Hi. My friend plays this board game and you sell wheat and make roads or something. I am not really sure because I have never played, but my friend plays and it was his birthday so BAM: settlers of catan cookies. The cookies were later placed on top of cupcakes and devoured at a local bar and grill. The cupcakes were amazing (and chocolate) and made by my friend's lovely wifey.


This is the actual game!
This is the cookie game!


Birthday boy and his birthday cupcake/cookie extravaganza.

I feel like I need to explain what is happening with the cookies just so we are all clear on the matter. I actually just checked the settlers of catan wikipedia page to ensure that I was naming the resources correctly....
Dark green: FOREST with happy little trees and a river (LUMBER)
Light Green: Pasture with chocolate chip sheep grazing (WOOL)
Red: Brick (duh)
Gray: Mountains (ORE)
Yellow: Farm/Wheat (GRAIN)
Sandy: Dessert! -- Covered with crushed graham cracker for sand effect
Blue: Water

xoxo

Tuesday, April 10, 2012

happy easter!

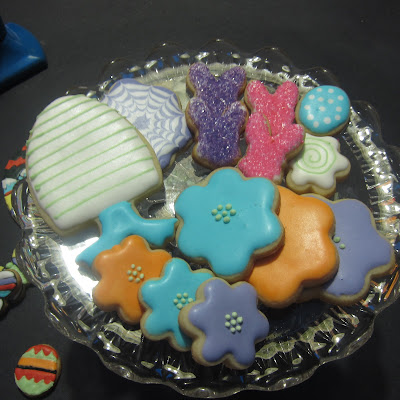
Here are the cookies I made for Easter. I showed you pieces before - but here they are all together.  I tried to make them look cute and arrange them on platters and use my dad's weird EBAY poster set-up. He takes pictures of antique spoons, etc on black posterboard and then posts them on the internet. He was annoyed that I got sprinkles on the poster. Anywho, here are the cookies:


xoxox

Thursday, April 5, 2012

BAD ROMANCE

Remember when I made these:


I did because my friend Ben sent me a picture of a lady gaga cupcake he had seen on the web. It was cuteee and amazing! But I wanted to do it emmy jean style and capture more outfits. So then this happened:


I think there needs to be a second set. I am envisioning: Meat dress. Bigger bows. Her coming out of an egg - you know usual gaga stuff that would be amazing in cupcake form. Hhhmmm...

xoxo


Monday, April 2, 2012

Stain Glass Mini Butterflies

Hi. Here are some mini butterflies I made the other day while I was making Easter cookies. Just so it's clear, I think I have cookie ADD. When I make a collection of cookies, every cookie is different or maybe 3-4 are similar. I like variety and mismatch. So, here are four that match!


WHAT YOU NEED:
  • sugar cookie dough
  • mini butterfly cookie cutter
  • royal icing tinted: multiple colors
  • icing bags
  • decorating squeeze bottles
  • tips: #1, #2

** You can use any cookie recipe you like. My personal favorite sugar cookie recipe is from I AM BAKER found here in her rose cookie tutorial: http://iambaker.net/rose-cookie-tutorial

** My favorite royal icing recipe is from The Sweet Adventures of Sugarbelle: http://www.sweetsugarbelle.com/blog/2011/04/royal-icing-101-or-all-roads-lead-to-rome/
(PS Royal Icing can be your BFF or your worst enemy. The trickiest part is getting the correct consistency. I am still figuring it out.)


DIRECTIONS:
  • Roll out dough, cut out butterflies and bake.
  • Make and tint your royal icing.
  • Once cookies have cooled, time to decorate!

1. Using a #2 tip and thick consistency royal icing, add a dot for the butterfly head
2. Pipe from side to side from head to bottom of cookie for butterfly body
Let icing dry for a few minutes.

3. Using a #1 tip and thick black consistency royal icing, outline the wings in any pattern you like. (We are using such a small tip because these cookies are TINY - maybe 2 inches long - small cookies are cute but more of a pain to decorate - you can use any size butterfly cutter you would like- a bigger one might be easier to use at first)
Let icing dry for a few minutes.

4. Fill up your squeeze bottles or a ziplock bag (don't forget to snip corner) with thin consistency icing. It is a good idea to FLOOD a section and than skip a section and than FLOOD. This gives the icing a little time to dry so it's less likely to run into the other sections. (If that makes sense. I should have taken another photo!)


5. Let cookies dry. Once dry, they can be stacked. I actually put these in the freezer. I have not had a problem in the past with decorating cookies with royal icing and then freezing them. They taste and usually look the same! Although, sometimes the colors don't look as vibrant. Also, if you use sanding sugar or little edible decorations -- these can fall off in the freezer. The best would be to freeze an undecorated cookie and then decorate it once it has thawed.

C'est fini!
xoxoxoxo

Sunday, April 1, 2012

HOW TO MAKE CUTE POLKA DOT BABY CHICKS

What is cuter than polka dots, babies and chicks? POLKA DOT BABY CHICKS.


WHAT YOU NEED:
  • sugar cookie dough
  • baby chick cookie cutter
  • royal icing tinted: white, purple, orange, black, green
  • icing bags: disposable or not (sometimes I use a ziplock and cut a TINY hole in the corner of the bag)
  • decorating squeeze bottle
  • tips: #1, #3

** You can use any cookie recipe you like. My personal favorite sugar cookie recipe is from I AM BAKER  found here in her rose cookie tutorial:  http://iambaker.net/rose-cookie-tutorial

** My favorite royal icing recipe is from The Sweet Adventures of Sugarbelle: http://www.sweetsugarbelle.com/blog/2011/04/royal-icing-101-or-all-roads-lead-to-rome/
(PS Royal Icing can be your BFF or your worst enemy. The trickiest part is getting the correct consistency. I am still figuring it out.)

DIRECTIONS:
  • Roll out dough, cut out chicks and bake.
  • Make and tint your royal icing.
  • Once cookies have cooled, time to decorate!
1. Start off by outlining chick with purple royal icing # 3 tip.


2. FLOOD chick with thin consistency purple icing. An easy way to do this is fill the squeeze bottle with the icing and literally flood the cookie with icing. The outline of thicker icing will keep the royal icing in its place. Don't worry if the icing did not spread to all corners because...

3. You can use a toothpick to push icing to all corners of the cookie.

                                            
4. While chick is still WET, add dots of white icing. (#3 tip) You can use any color or multiple colors. Get crazy!

 5. Don't forget to add a beak and legs. (#1 tip)

 6. At last, add a dot for an eye. (#1 tip) Once cookie dries, it can be stacked on top of other cookies without ruining the icing. The beauty of royal icing!

All done! K, have to decorate more cookies !